Saturday, 31 August 2013

Swatch and Review - Glitter Gal

Hey all, I'm back with some more great polishes to review kindy sent to me by Maconii, and today I bring you some gorgeous holo's from Aussie brand Glitter Gal!

I have 4 polishes to show you, and each polish has 3 images, the first two pictures for each polish were taken in direct sun light, and the third pic in artificial light. This first polish is a golden lime green '24 Carat''. This polish was slightly on the sheer side and I applied 3 coats where as with the other 3 polishes I only applied 2 coats.


 This second polish is a warm and neutral coffee colour and is called ''Suede'', I'm going to enjoy wearing this once when I get a nice tan in the summer as neutral colours always suit me better with a tan!


The third polish is ''Frappe'' and is a lovely sweet lilac. Honestly I'm not normally a fan of lilac, on receiving this I realised I didn't have a single lilac polish before this one and yet I love it! Who knew!?


The last polish is my favourite of the bunch (those who follow me regularly know I always leave the best til last!) and this is a stunning dark purple called ''Crushed Ego''. WIth the deep colour it was difficult to catch the full holo effect on camera but it was much more visible in real life.


I found the application of these polishes to be quite good, though they did not agree with base coat at all. I tried both a normal base coat and an acqua base, but these holo's applied very streaky over both, without a base coat at all they went on perfectly smooth and even though. The holo effect is quite subtle compared to similar polishes I have seen and yet is still very visible, even in artificial light. I would definitely recommend these holo's and the Glitter Gal collection also has a huge range of colours to choose from! You can check them at out at Maconii.

Tomorrow I will be continuing with the spotllight on polishes available from this great country, and have swatches of a couple more Aussie brand beauty's!


Friday, 30 August 2013

Swatch and Review - Colour Club

This week I have received some lovely polishes from a new Australian based beauty supplier, Maconii who have some great polishes in stock such as Color Club, Joss, Megan Miller and Gliter Gal, today I have 3 Color Club polishes  to show you and tomorrow I will be back with some Glitter Gal!

The first polish I have for you today is 'Wish Upon a Rock Star' and is a very festive glitter topper. The glitter is mainly small hex glitters in blue, red, green, gold and silver, and large pale pink hexes. With such a collection of contrasting colours it's a polish that's very difficult to photograph! In the pictures I am wearing one coat as a topper over Sinful Colours 'See You Soon' , and 4 coats of the glitter only on the accent nail, this first image was taken in direct sun light.


This second image was taken outdoors in the shade and in this picture you get a much better view of the different colours of the glitter.


This last image was taken indoors in artificial light.


This polish is not quite to my personal taste, I'm a bigger fan of complimentary colours than contrasting colours, but credit where credit is due this was a great polish to apply, the glitter went on smoothly and evenly with normal brush strokes, and I didn't have to fish around in the bottle to get the larger hexes or have to individually place them on the nail. It was also easy to get full coverage of the nail with only glitter as the bottle is quite densely packed.

The next polish I have was quite deceiving and I almost believed it was a dud, which was upsetting because I have been lemming after this one for a while and couldn't believe my luck when it turned up in the package! The polish is ''Untamed Luxury'' and is an emerald coloured jelly with silver glitter. I applied this polish sat in the shade of my patio at lunchtime, and when I finished I was a bit disappointed. The Jelly is pretty, but the silver glitter was a bit boring, it wasn't especially sparkly or colourful, I thought it really spolied it as the jelly colour is very nice, so I really thought it was a dud. But then I went out into the sun to take the pictures, and instead it was like ''Holy colour and sparkle Batman! There are laser beams coming out of your finger tips!''. This polish really came to life in the sun, and was mega sparkly and gorgeous with holo glitter goodness, I felt like I had nails actually covered in bright sparkling emeralds!


The first pic was taken in the sun and the second indoors in artificial light. As some of you may already know my camera doesn't like scattered holo glitter and can't quite catch the true sparkle so you are going to have to trust me on this one!


This polish was great to apply too, nice even strokes and no fishing for glitter. For a jelly polish it has quite good opacity too and here I am wearing 3 coats.

The last of the Color Clubs for today is an absolute stunner, a duochrome that goes by the name of ''Portfolio''. It's a mixture of dark purple / mauve and teal and lime green, its a hypnotic combination! Being a duochrome I had to take lots of pics to try and catch all the colour changes of course, these first pictures were taken in direct sun light.


The next 2 pics were taken in the shade where the colours have a whole new tone, much more muted and neutral, and quite undescribable!


These last 2 pics were taken indoors in artificial light which gives a dark bold tone to the colours.


This polish was a dream to apply, opaque in just 2 coat and dried very quickly. I was really mesmerised by this one, it's such a strange and wonderful combination of colours. Personally I would have called this polish ''Witch Craft'', there is something so dark, mysterious and magical about it.

Join me tomorrow when I will becontinuing my review on the polishes sent to me by Maconii, and I have swatches some of the gorgeous holo's by Aussie brand Glitter Gal!

Thursday, 29 August 2013

Leather Effect Manicure Experiments

I'm a bit in love with the Sinful Colours polishes, and I've noticed recently swatches flying around of a new Luxe Leather Collection, which doesn't appear to be available anywhere near me just yet.

But my  mad curiousity to see leather effect nails, general impatience and that annoying little thing in my head that wont let me rest once I have an idea, pushed me on to start thinking of cheats to get my leather effect nails NOW. 

First I remembered I have a box of off cuts of leather somewhere, I dig it out and select a few pieces of the thinnest leather I can find in there. I then try to make nail shaped decals out of the leather with my nail scissors but couldn't get them to stick at all, even the thinnest leather I found in that box was still too thick to stick on my nail. Bummer. :(

So I decide to try something else, I applied my base coat and polish, let it dry for a while and kept my eye on the drying to catch the moment when it's almost completely dry, but still soft enough that you'll leave a mark on it if you touch the surface with the tip of your nail, that last moment where it's still possible to leave the faintest finger print on your perfect polish surface. When that moment arrived I grabbed a small piece of leather, and pressed it gently into the polish on each nail.

What I was left with reminded me of the actual texture polishes and looks kinda cool!


I thought it would look more leather like if there was a matt effect, but it wasn't successful. I tried to add a thin layer of matt topcoat to the finished textured polish, but the top coat softened the effect too much and it was barely visible anymore. Then I tried again by applying a layer of matt top coat, letting that dry for a moment and then pressing the textured leather directly into the drying matt top coat. That didn't work either though because the matt top coat drys too fast, it wont take the imprint of the leathers texture, and if you press too hard it peels up all the layers of polish with it. 

So in the end I settled for a smooth matt accent nail which I think still adds to the leather concept a lot, but I am curious to try a black polish thats already matt and doesn't require a top coat (suggestions in the comments please!) and see if I can mould that in the final stages of drying.

I'm still happy with how my leather mani worked out, I think it's subtle but still quite cool, and I have to say I enjoyed playing with textures and might explore this area a bit more!


Wednesday, 28 August 2013

Sometimes you just have to wear the polish you love, and only that...

I didn't get a chance to post this earlier because I was in late with my nail art challenge yesterday and that had priority, but technically this mani came first.

When my Arabian Nights mani came off I didn't feel like doing nail art because I knew that nothing I did in that moment would be as good as the beauty I just tearfully wiped off onto a cotton pad. The only thing I could do that would be guaranteed to make me feel good about it, was to turn to a favourite polish that just never disappoints me when I wear it. The love of my life... OPI You only live twice.


I'm a sucker for a good red with a slight fuchsia tint, and with the sparkles too this one had to be mine. It's the only OPI polish I've ever paid full retail price for, $20 damn dollars. I found it in a Beauty Boutique on a trip to Byron Bay, I hadn't even spotted it it was my friend who brought it to my attention (Damn you Emma, you should have left well alone!). I would never have bought it if I hadn't have seen it with my very own eyes and was actually a bit flush that weekend for a change. But everytime I wear it I'm glad that i bought it, and the first hint of that bright sparkle makes me want to go out and pay full retail for it all over again.

Which polish makes you guys feel this way?!

Tuesday, 27 August 2013

Nail Art Challenge, Inspired by an Artist - Frida Kahlo

Apologies for my absence the last couple of days, after my knock out Arabian Nights mani I had to take a break on the nail art and for once actually wear a design I have done for longer than 24 hours! I got to wear that beauty for 4 whole days in the end and it was glorious! I also needed some time to tend to affairs in my real life too, as much as I would love to spend all my days wrapped up in polish heaven, via mani's and my blog, unfortunately there is another world out there which expects me to be a responsible participating member of society - there is more to life than polish apparently, who knew!?

Couldn't abandon my post for too long though as today is nail art challenge day and I'm in with Frida Kahlo this time, she is a Mexican painter who is famous for her many self portraits. I was a bit concerned about trying to do something from one of her images, I'm not very good at painting faces and I knew anything I attempted would be childish or cartoonish, and there were only one or two paintings that weren't portraits or at least included a few other details than the portrait itself. I came across a beauty though!

This is ''Diego and Frida'', a portrait of the artist and her husband that she painted in 1944 as a gift for him for their 15th wedding anniversary. The painting is all about union symbolised by the sun and the moon, and the conch with the scallop, and the connections between everything with this anatomic heart like structure. I found it to be an intriguing image as despite it's surrealist imagery it has such an earthly feel to it, surreal almost seems natural.


I would be very interested to see more images like this one if Frida Kahlo has done any, I will certainly be keeping an eye out from now on! I would love to say that my attempt came out just as good, it doesn't even come close! It was so difficult to capture that earthy warmth on a little nail and my own effort seems very cold and macabre in comparison.


Doing this mani I also realised that I am missing some colours from my polish collection, like brick reds, browns and other earthy tones, so in the end I used acrylic paint to create this entire mani, and just used my nails as mini canvases with my nail art brushes. The moon is probably my favouite part of this mani, but that guy is gonna have to start paying me comission, this is the second ttime in a row that moon has been on my nails!

Thanks for catching up with me today, be sure to come back as this week I'll be bringing you some swatches and reviews for some gorgeous polishes that you will not want to miss!


Saturday, 24 August 2013

Arabian Nights Gradient and Sillhouettes

This week I won something for the first time EVER! I won 3 stamping plates from Messy Mansion with their Facebook giveaway! I chose 3 plates that I wanted for my prize, which are yet to be delivered, but while I was looking through their designs to choose I spotted an Arabian themed plate which they will be releasing at the end of September. It is really beautiful and I was bummed that I couldn't order it as part of my prize (not that I'm complaining I have 3 gorgeous plates on the way anyway!) but seeing the Arabian plate inspired me to do an Arabian Nights theme mani. I could have waited until the end of September to get the plate and do the mani, but I don't have that much patience! Once I get an idea I have to go with it!

Let me tell you, I am soooo glad I have no patience and just decided to go for it, because I am IN LOVE with what I came up with. As far as I'm concerned it's a masterpiece and possibly the most beautiful mani I have ever done!


To do the gradient I used BYS neons, ''Shimmer Golden Sands'' (yellow), Satin shade 5 (dark pink) and Sinful Colours ''Daddy's Girl'' (purple) and I am super happy wth the choice of colours, I think they look stunning together in this gradient. I painted the sillhoutte of the building, palm tree, camel and pyramid using nail art brushes with a black creme by Sally Hansen, and then painted the moon and dotted the stars with a very fine brush.


I honestly think this is one of the most beautiful mani's I have ever done, and it is going to be soooo hard when the time comes to remove it, I think I might actually cry a bit! I'm also slightly concerned as I might have outdone myself and may never be able to produce something more beautiful than this again, infact, everything I do from this point on is probably going to look like crap in comparison! Have any of you ever created a mani that made you feel the same way?!


Friday, 23 August 2013

Kaleidoscopic Nails Inspired by Susan Drummen

On my facebook wall the other day appeared this link to an article about an artist Susan Drummen and her amazing gallery installations, that were just breath taking and totally inspiring, so I tried to capture her art on my nails. 

Before I even show you the mani click HERE and see the article I'm talking about, no seriously do it, you do not want to miss this and you will totally thank me for it, also my nails will make so much more sense if you see this first.

Seen it? HOW AMAZING IS THIS WOMAN? Those super colourful kaleidoscopic patterns created entirely from thousands and thousands of individual pieces of glass, mirror, crystals and tiles, the patience that woman must have to create something like that, seeing those images made me want to tile my whole house in the same way, but I settled for my nails instead, which was much less time consuming and considerably cheaper! So here is my Susan Drummen Kaleidoscope mani...


I tried to match the style of the artist by using different materials to create the image, and so as well as the dots the patterns have also been created with rhinestones, individually placed holographic glitters and caviar beads. You will hae to excue me if I don't go into the polishes I used, there are a total of 21 different colours in this mani! 


My only regret is that my nails are not big enough to continue these patterns in the infinite manner that the artist does, hmmm, looks like I'm gonna have to get to tiling my house anyway!! It has to be done!


Thursday, 22 August 2013

Decals with Crafts Shaped Hole Punchers

So I was routing around in my paper crafts box and came across a heart shaped hole puncher that I didn't even know I had, and moved it to the tools shelf on my nail bar! Then I spotted the perfect polish to try it with, promptly removed it from the tool shelf on said nail bar because I had to use it immediately!

I'm really happy with how it turned out and love the polish I used! 


The punched hearts were quite large so I was limited in how I could place them on the nail, but I managed to squeeze them on quite nicely in the end. To do the hearts I painted a layer of polish on a freezer bag, and once it was dry I peeled it off and punched the shapes out of it. I did the accent nail by trimming a piece to fit my nail from the layer that had all the other hearts punched out of it. For the base I used my usual white, Sinful Colours ''Snow me White'' and the hearts were made from this gorgeous jelly polish you can see in the bottle there, Sinful Colours ''Nail Junkie''. I absolutely LOVE this polish and with a name like that I just had to have it!


I tried to get a close up shot of the bottle content, it's a beautiful greeny blue jelly packed with blue, teal and green glitters, it's really quite stunning! I confess I have a bit of a thng for blue polishes, without even realising it I have collected many more blue polishes than any other colour! I have another couple of stunners from the Sinful Colours collection that I need to use too! Hmmmmmmmmm!

Stay tuned for tomorrow as I have a special mani inspired by the most AMAZING art installation I have seen! 


Wednesday, 21 August 2013

Copy Cat Myth Busters Mani

So today I just wanted to quickly show you all a mani I did for my friend last week for a themed birthday party she was going to on Saturday night. 

This is one mani that escaped my nail fail week, but only because it's nothing more than an exact copy of a mani previously done by another well known blogger. My friend had found this mani herself and sent me the link for exactly what she wanted and I gave it to her, but I certainly can't take any credit for this design!!

So here is my Myth Busters copy cat mani:


I'm happy with how it turned out, but it's easy to copy! The original design was done by Chalkboard Nails and you should check it out HERE.

I have to admit, after the series of fails I was happy to do a mindless copying task and not have to worry about it looking terrible!

Tomorrow I will bring you an original mani that is really pretty!

Tuesday, 20 August 2013

Nail Art Challenge, Inspired by an Artist - Vincent Van Gogh

So after my series of nail fails last week (a couple of which I spared you all from seeing and threw straight in the trash!) I needed to take a couple of days off to reset as continuing with disappointing mani's was just making me more and more frustrated. Couldn't take off too much time though as my mani for the Llama nail art challenge was due, and as usual I'm in right at the last minute! Fortunately the couple of days seemed to do the trick, and I'm happy with what I've done for this challenge.

This week is Vincent Van Gogh and there were so many beautiful paintings to choose from, there was only one for me though, as it's a painting I was lucky enough to see in person at a museum in Amsterdam, and this painting is Almond Blossoms. 


So here is my mani, and I am soooo glad that my nail fail week has officially come to an end!


I used a whole bunch of polishes in this mani that I'm not even going to get into, the base is a Constance Caroll polish that my mum gave me that I think they stopped making in the 90's (and you can tell from the toxic smell that polishes just don't have anymore!) so aint nobody gonna go looking for this one anywhere, and the other colours I used are a hugh mixture of all kinds of colours mixed together on a pallette. Everything was done with nail art brushes.

I managed to do a couple of other mani's that didn't completely suck too, so if you decide to re-visit my blog this week, I promise only pretties and no more nail fails!


Saturday, 17 August 2013

Holographic Meadow Mani Nail Fail!

So, I posted a kak mani yesterday and you still came back?? Well you're in for a treat then as today I bring you another equally kak mani! :)

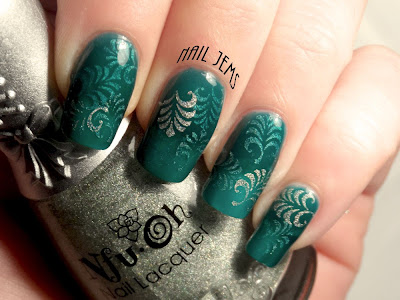
I found this gorgeous dark green shimmer polish in a sale bin this week and had to use it immediately, I imagined this beautful meadow scene with fresh, pretty daisies and crazy cool holographic grass accents, this is what I got instead! 


It's not how I imagined it would turn out, the holographic polish I used is actually green, but next to the dark green looks silver instead (and thats not just in the pic either, it looks like silver in real life too) and silver with green isn't really helping my intended theme, and is somewhat out of place in this mani.

The dark green polish is Sinful Colours 'San Francisco' and the holo is Nfu - Oh 66.

Again, another mani that in my head was drop dead gorgeous, but just didn't translate onto the nail and left me overly unimpressed. This nail fail week needs to come to an end and fast!!! 

Will you still love me even when I have bad nail days??? hahahahahaha


Friday, 16 August 2013

Gradients with Flowers

Im having a nail fail week this week, I keep doing stuff that feels awesome as I do it, and then I take the pics and I am totally unimpressed. And it keeps happening, despite my best efforts I still think that what I'm coming up with looks like total KAK. Gah.

So welcome to kak week on my blog, where over the next few days I will be posting the mani's that have totally unimpressed me, lol. I post my kak mani's in the hope that someone, somewhere, will have the capacity to see anything pretty in them, a capacity that fails me completely at the moment.

So here is my first kak mani, which was so much prettier in my head, it's a gradient with an accent nail. 


Firstly, I thought these colours in a gradient would look so much better than they actually do (should I have done the orange and pink the other way around?!). Secondly, I actually tried to do a nail stamp for my accent nail, but of course, what with it being nail fail week the nail stamping was completely uncooperative, and after 30 attempts to get a clear image for one bloody nail, I threw the towel in and my stamper across the room, and resorted to improv and free handed the flowers, which I think look really... kak. The white dots surrounding said kak flowers was a mistake too.

I was excited by the prospect of this mani, as I planned it my head I convinced myself it would be gorgeous, and instead I just feel less than meh.

If anyone is crazy enough to want to replicate this or something similar, the polishes I used were:
Sinful Colours 'Unicorn', Nfu-oh '354', and Duri ''Summer Peach' for the gradient, and the pink flowers were Sinful Colours 'Creme Pink'.

Come back tomorrow to see another kak mani that should have been awesome, come oooooon, you know you want to! hahahahaha


Thursday, 15 August 2013

Nail Foils and Top Coats - an Experiment

I have a huge collection of nail foils that I bought from Dollar Nail Art, most of which I haven't even got around to using yet as I still need to find a compatible top coat that doesn't ruin the effect. It's a bummer actually, I have so many foils because I figured if I was going to be paying high shipping fees from the states, I may as well wait until I can make a bulk order and get the most out of my shipping fee, so I ordered all kinds of stuff and got a nice big box full of goodies in the post, the large majority of which look crap when I use them because of the damn top coat.

Recently however, I have made a few polish purchases including some new top coats to try, so I thought I would try them out with my nail foils and see what happens. So first I applied a hand of nail foils in this stunning holographic gold.


This is not my best application of foils ever, it takes some serious skill and practice to get them perfect, and as I haven't bothered to wear them for a while because of the top coat issues my skill is a bit lacking at the moment and I could do with using them more often and brushing up on my technique. Normally I would be unhapppy to leave them in this condition and I would remove it and do it all over again, but for the sake of an experiment they were fine as is.

Anyways, there are four different top coats I applied in the following order:

Index Finger: Duri Rejuvacote
Middle Finger: Loreal Jet Set
Ring Finger: Revlon Quick Dry
Little Finger: Sally Hansen Nail Shine Miracle

and here are the results!


As you can see the results are not great. The top coats ruin the holographic coloured effects almost destroying them completely, and they ruin the smooth metallic finish with what appear as a million tiny bubbles all over the surface, but there was one clear winner and that was the pinky! 

The little finger had Sally Hansen Nail Shine Miracle, which didn't cover the surface of the nail in bubbles and left the holo colours intact. Do you know what the most annoying thing is? The Sally Hansen is not even a recent purchase, I have had it for ages and never knew that it was good to use with foils, how have I not tried it before already!!! GAH! The worst part is I have other top coats to use, I always have a selection, and my Sally Hansen bottle which I paid almost $15 for and wasn't even that impressed by as a top coat over polish is now almost finished, all this time I should have been saving it to use only with foils, and now I gotta go out and spend another $15 dollars for a bottle!!!! Again, GAH! I'm such an idiot! I wouldn't have bothered to buy this top coat again, I have other prefered top coats at a much lesser price, and now I gotta fork out for it again anyway as it's the only one I know of that seems to work OK with foils, I should have figured this out forever ago!

So let this be a lesson to you ladies, or rather two lessons: 1: Sally Hansen Nail Shine Miracle works well with foils, 2: When you get a new top coat test it over EVERYTHING so you don't go wasting it on one thing when you should be saving it for another!!!

GAAAAAAAAAAAAAAAHHHHHHHHHHHHHHHH!

Wednesday, 14 August 2013

Shameless Publicity of my Husbands Business - with Water Decals!

I was looking over what is fast becoming a vast collection of naily bits and bobs trying to figure out what to do on my nails, and my eyes wondered over some home printed water decals that I had prepared a while ago but didn't get around to using yet.

These water decals have the logo of my husbands design business - Forehead Design, I wanted to do nails for him to show my support, but also because some of you may actually find his services quite useful! He is a very talented designer who works a lot with web and blog design, photo and film editing, corporate branding and 3D special effects (amongst a million other things), so yes, this is shameless publicity of my husbands useful services to the blogging community!

I have taken inspiration from the logo profile image he uses on his facebook page which you can see (and like!) HERE.


To do this mani I painted a white base using Sinful Colours 'Snow Me White' and mixed together a few different blue polishes to the get the right shade. Then using a sponge I dabbed the blue mixture around the edges, dabbing again with white to blend it in. I finshed by applying the decals and covering with top coat. 

I think my husband's logo is so cute and really clever! The little guy is supposed to be my husband and has the same hairstyle hahaha! These nails were simple and fun to do and I think they look pretty cool! I will have to wear these the next time we go to one of his client networking barbeques as a living advertisement! lol


If you are interested in getting someone to design a blog or website for you, why don't you check out my husbands portfolio and see what he can do! www.foreheaddesign.com

Tuesday, 13 August 2013

Nail Art Challenge, Inspired by an Artist - Picasso

So after a mad swatchathon last week we're back to the usual schedule, and I have last weeks nail art challenge mani that as usual I'm posting right at the last minute! This time it's Picasso and I was excited about this challenge as his art is colorful, bold and unusual with lots of pattern, which is exactly how I like it!

I did a great mani for this challenge, was super pleased with it, and then everything went wrong when I applied my last layer of top coat and smudged all the detail. DEVASTATED. I'm very anal when it comes to stuff like that, a raging perfectionist, and I really just wanted to take it all off and start again despite the fact that it took me hours to do the first time round, because I knew it would bug me eternally. And it will, but I figured as a blogger it's only fair to show my nail fails too, that way maybe someone else can learn from my mistakes! So, perhaps against my better judgement and that raging perfectionst inside me thats screaming ''DON'T YOU DARE POST IT JUST DO IT AGAIN!'' here is my smudged Picasso mani!


To be fair, the smudging is not that bad and you can still see the original design quite well, but I know it's there and it bugs the hell outta me! My husband argued that I should just leave it as it gives it a bit more of a bush strokey feel, but I think he was just trying to do some damage control as he knows how freaky I can get over these little things!

I didn't take inspiration from a specific painting this time, with Picasso everyone knows that it's colour, patterns, abstract, misplaced eyes and features and what not, so I just decided to adopt his style and go for it, see what I could come up with my self. 


To do this mani I started with a plain white base (Sinful Colours 'Snow Me White' and with the 3 main colours I had chosen ( Duri 'Voodoo', Sinful Colours 'Hazard' LA Girls 'Mermaids Lagoon') I painted a different shaped area with each colour on every nail. Then I used a dotting tool and striping brush to add patterns, and  finished by adding all the black lined detail, and this was my mistake. 
Those of you following my blog may have seen my previous posts about using marker pens for nail art (HERE) and a follow up post I did about smudging (HERE). I used a black fine tipped marker pen for the details in this mani, and was most surprised when I realised it was smudging as I had not experienced any smudging at all when I had previously used marker pens, it was completely unexpected. Then I realised that the black marker pen which is a new purchase, is actually a different brand from the marker pens I had used before, (before I was using Bic coloured markers and this was a black Sharpie) and I had also used a different brand top coat from before, in my older mani's I used Revlon, and this time it was Loreal. So like and idiot I had gone and used untried brands of products on my painfully time consuming Picasso masterpiece! GAH!

Obviously the worst of the smudging was on the one nail that gave the real clue as to who this mani was inspired by, and made a real mess of it! I can't tell you how sad I was when it happened, and how sad I still am just looking at this picture. Boooooo.
But I am trying to take away something positive from this mani, a lesson that is, and the lesson is that I now need to do further experiments into my use of marker pens before I go and ruin my mani's with them.


So I'm going to turn this mani tragedy into a future post about the use of different brand marker pens and top coats, and post the results of my mad scientist like experiements so that no girl shall have to suffer as I have done!! Onwards to the stationary shop Jeeves!


Sunday, 11 August 2013

'Nfu - Oh' Swatch & Review Feature Week, Day 7 - Nail Art Special Part 2

Welcome to the very last day of my Nfu - Oh feature week in collaboration with CRUSH COSMETICS!

Over the last week I have swatched five different and fabulous collections of the Nfu - Oh polishes, with the week culminating in a special nail art feature with designs created exclusively with these collections. 
Today I bring you the final 2 mani's that I think are particularly nice, simple to do but very striking.

To do these designs I used polishes from the creme collection, the jelly collection, the flaky collection and the holo collection, and they show you some of the amazing things you can do just with nail polish.

For this first design I have done jelly layering with metallic images, using the Nfu - Oh jelly JS33 and the Nfu - Oh holo 66. To do this design I started with a base of 2 coats of the jelly polish, and then stamped a leaf design from plate BM01 with the holo polish, one leaf on each nail and in different positions. I then painted another layer of the jelly polish over the leaves, and once the new coat was dry I restamped the leaves in a different position on each nail. I continued this process until each nail was covered in the individually stamped leaves, and then finished with a top coat so that the leaves stamped last retained their colour without having the jelly polish over it. This technique has given a lot of depth to the design, as each leaf on one single nail has a diffferent number of layers of jelly polish over it resulting in lighter and darker tones of the leaves.
This is without a doubt my favourite thing to do with jelly polishes, and the holo polish turned out to be just perfect for stamping. Though this polish does loose it's holo effect when stamped, it still makes a great stamping polish as it is densely pigmented, very bright and metallic, and gives very clean and visible stamped patterns. You have to love a versatile polish that can give you 2 great effects in 1!


The next design is so so simple, but it shows you how you can get creative with what is essentially just a fancy top coat. For this design I used Nfu - Oh creme 517 and Nfu - Oh flaky topper 40.
Just because its only a topper, doesn't mean you should just slap a full covering coat on and be done with it! There are so many possibilities, this being one of them!


Instead of just applying your standard coat of flaky topper, I painted it on in thick curved lines through the middle of the nail and then on the tip. It was such a simple thing to do but the effect is quite dramatic. I love how the thick layer of flaky polish almost gives it a 3D effect, and how the colours in the flaky compliment the base colour so well without covering it completely.


It's so easy to get lost in all the fancy and complicated nail art technques that there are available now, so it's been really nice to just take it back to basics for a moment and remind myself how much beauty can be achieved from such simplicity! 

I would like to thank those of you who kept coming back to enjoy my Nfu - Oh feature week, and of course CRUSH COSMETICS for sending me these amazing polishes to review. I have had so much fun trying and experimenting with them, taking the pictures and creating these posts, and can't wait to bring you more wonderful products in the future!

This is the end of the Nfu-Oh feature week, and I'll be back this next weeek with my usual mish mash collection of nail designs, challenges and general nail madness! 


Related Posts Plugin for WordPress, Blogger...